In this tutorial I will cover how to setup an Munki environment in the cloud. OSX clients will use a HTTP header Array to authenticate towards an dockerized nginx-s3-proxy that will serve repo hosted on AWS S3.
Prerequisites
I take for granted that you have a local munki repo running in your internal environment. You have basic understanding of Docker and AWS. I also expect you to have an AWS account and know how to create s3 buckets and setup additional IAM users and policies.
Tools
Lets get started
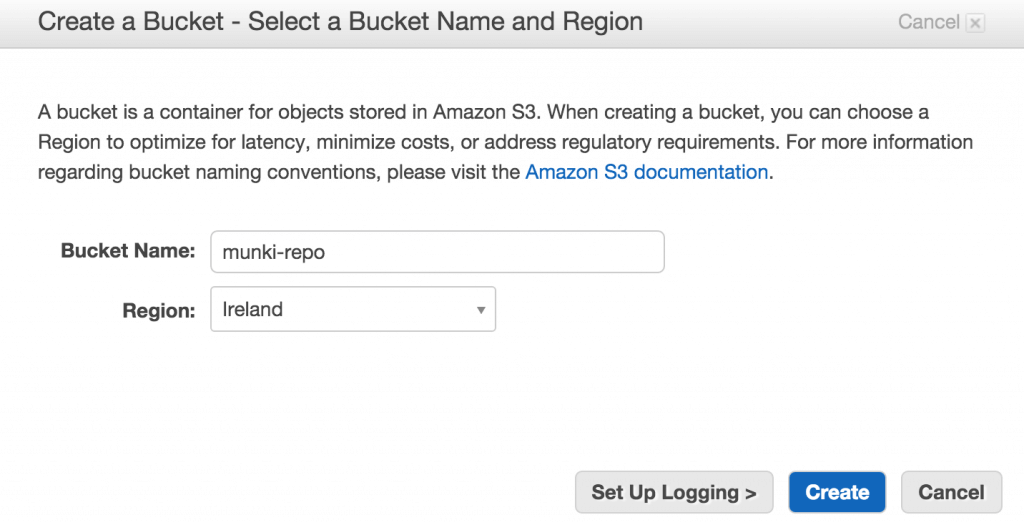
Lets start with AWS and create a bucket and IAM users and policies.
I chose to use Ireland (eu-west-1) to create a bucket called munki-repo. This will serve as the cloud based storage and where munki clients will pull its information.
There is a issue with Frankfurt (eu-central-1) that requires AWS4-HMAC-SHA256 and this is not supported by NGX_AWS_AUTH plugin.

I recommend two IAM users one with RW (read-and-write) policy that will be used on the local munki repo host so it to be able to push and remove information. Second user will be a RO (read-only) used by docker container to serve the interface to the s3 bucket.
Here are two example policies with RW and RO. Change arn:aws:s3:::munki-repo and arn:aws:s3:::munki-repo/* to match your S3 bucket.
{
    "Version": "2012-10-17",
    "Statement": [
        {
            "Effect": "Allow",
            "Action": [
                "s3:GetBucketLocation",
                "s3:ListAllMyBuckets"
            ],
            "Resource": "arn:aws:s3:::*"
        },
        {
            "Effect": "Allow",
            "Action": [
                "s3:ListBucket"
            ],
            "Resource": [
                "arn:aws:s3:::munki-repo"
            ]
        },
        {
            "Effect": "Allow",
            "Action": [
                "s3:PutObject",
                "s3:GetObject",
                "s3:DeleteObject"
            ],
            "Resource": [
                "arn:aws:s3:::munki-repo/*"
            ]
        }
    ]
}
{
"Version": "2012-10-17",
"Statement": [
{
"Effect": "Allow",
"Action": [
"s3:GetBucketLocation",
"s3:ListAllMyBuckets"
],
"Resource": "arn:aws:s3:::*"
},
{
"Effect": "Allow",
"Action": [
"s3:ListBucket"
],
"Resource": [
"arn:aws:s3:::munki-repo"
]
},
{
"Effect": "Allow",
"Action": [
"s3:GetObject"
],
"Resource": [
"arn:aws:s3:::munki-repo/*"
]
}
]
}What about repo content?
There are many ways to store the your local repository. If you are using ex. Synology NAS you could use Cloud Sync. OSX have several GUI applications you can use ex. Mountain Duck.
I use AWS CLI to sync local repo with S3 bucket using command line. AWS CLI can be installed using Brew
brew install awsclithen run
aws configureI recommend you setup both your admin machine and osx server.
On your server use the same RWAccessKeyID and RWSecretAccessKey to setup aws configure and you are ready to run
aws s3 sync . s3://munki-repowhere you change s3://munki-repo to match your s3 bucket and the content will be uploaded.
Docker
I have been using docker-machine to generate EC2 images. AWS has their own service called Amazon EC2 Container Service (ECS) so might update my guide at a later point.
When you create your EC2 image using docker-machine you need a IAM user with EC2 policy. You also need to specify under which VPC ID you want your machine.
docker-machine create
      --driver amazonec2
      --amazonec2-access-key EC2AccessKeyID
      --amazonec2-instance-type t2.micro
      --amazonec2-region eu-central-1
      --amazonec2-zone a
      --amazonec2-secret-key EC2SecretAccessKey
      --amazonec2-vpc-id vpc-0aa000aa
      --engine-label project_name=docker-services-s3proxy
      --engine-label tier=production
      --engine-opt log-driver=syslog
      --engine-storage-driver devicemapper
      docker-services-s3proxy

eval "$(docker-machine env docker-services)"
s3proxy docker container
It’s time to clone a base repo. Because we want to add our security methods like Basic Authentication. You will also have the possibilities to configure nginx.conf to use SSL Client Certificates.
Using git clone –recursive also pulls nginx plugins lua-nginx-module, ngx_aws_auth and ngx_devel_kit using gitmodules.
Once repo is cloned you need to create your .htpasswd file. Change USERNAME and PASSWORD to something appropriate I recommend using a phrase or a quote from your favorite book or movie ex. iseeyourschwartzisasbigasmine. These will be used later in the munki client configuration.
You are now ready to start the container and you need to use some of the credentials and keys created. You also need to choose a port to use. It should look something like 60080:80 where the high number is the port munki client will use.
If you are using AWS EC2 for you docker-machine you can open ports using AWC CLI. First you need to find the machines GroupId. Then open the port you chose in your container.
git clone --recursive https://github.com/erikaulin/docker-s3proxy.githtpasswd -c .htpasswd USERNAMEdocker build -t s3proxy .docker run --name s3proxy
-e S3PROXY_BUCKET_NAME="munki-repo"
-e S3PROXY_AWS_ACCESS_KEY="ROAccessKeyID"
-e S3PROXY_AWS_SECRET_KEY="ROSecretAccessKey"
-p 60080:80
-d s3proxyaws ec2 describe-instances | grep GroupIdaws ec2 authorize-security-group-ingress --group-id sg-cd00xxx0 --protocol tcp --port 60080 --cidr 0.0.0.0/0Munki Client
Now we are ready to start using your munki repo in the cloud. You need to generate a HTTP Headers Array based on the USERNAME and PASSWORD. Using the python command you can generate this just change the details and run. Now you just need a IP or DNS record to the docker-machine. In my case I created a A record.
With these two commands your can update your clients to use the new URL add activate the use of HTTP Header array.
python -c 'import base64; print "Authorization: Basic %s" % base64.b64encode("USERNAME:PASSWORD”)'

sudo defaults write /Library/Preferences/ManagedInstalls SoftwareRepoURL "http://munki.aulin.co:60080"
sudo defaults write /Library/Preferences/ManagedInstalls AdditionalHttpHeaders -array "Authorization: Basic bsfaJSdsfadsfaadfJFADAFADddaa=="
Good luck and hope this guide could help or just inspire your.
Cheers Erik
